
Removing a door lock cylinder is a direct way to restore smooth operation or update hardware when a key system changes. The cylinder is the part of the lock that recognizes the key and drives the internal mechanism. When it becomes worn or when access policies shift in a small business or rental space, replacing the cylinder provides a clean and efficient reset. This guide explains how to approach the process with clarity and consistency so you can maintain secure entry without disrupting daily operations.
Understanding the Door Lock Cylinder
How a Cylinder Works
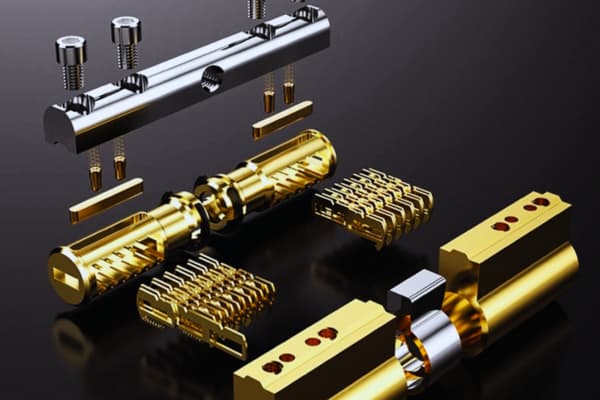
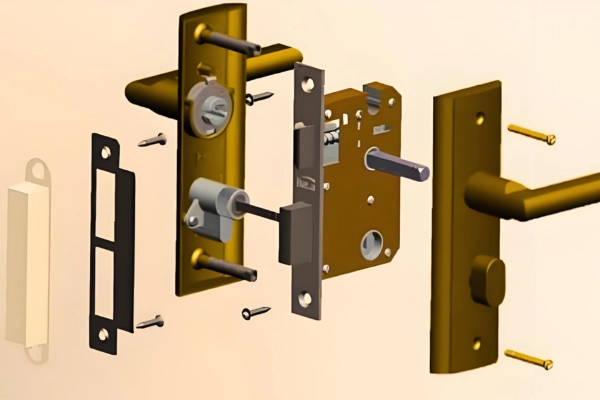
A door lock cylinder houses the components that interact with the key. When the key aligns the internal pins, the cam rotates and activates the latch or bolt. This makes the cylinder the primary part to adjust when a key is lost, when staff roles change, or when the lock shows signs of wear.
When Removal Becomes Necessary

Cylinder removal supports several common scenarios. A business may replace cylinders during employee turnover to maintain controlled access. A property manager may update hardware after a tenant moves out. Homeowners often replace cylinders when the key sticks or when the lock does not respond smoothly. Removing the cylinder provides a direct way to resolve these issues without replacing the entire lock.
Identifying Your Cylinder Type
Correct identification helps you plan the removal steps. Common designs include single cylinder, double cylinder, Euro profile, deadbolt, key in knob, mortise cylinder, and interchangeable core systems. Each option uses a different retention method. A quick visual check of the lock face and door edge helps you determine the structure before you start.
Preparing the Right Tools
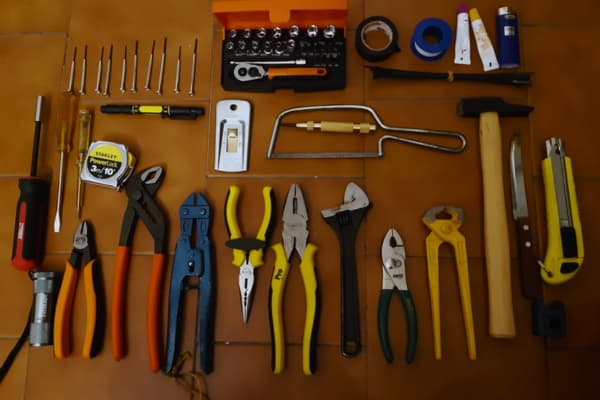
A clear tool set makes the removal process efficient. Most cylinders can be removed with a Phillips screwdriver and a flathead screwdriver. Some installations use an Allen wrench, especially on commercial knobs or levers. Needle nose pliers help release clips on certain designs. A measuring tape ensures proper sizing for the replacement cylinder. A graphite based lubricant improves movement when hardware is tight. Keep a small container nearby to hold screws for organized reassembly.
Step by Step Removal Process
Create a Safe Working Setup
Keep the door open and secure it with a wedge so it does not close during the process. This prevents lockouts and ensures a stable environment. Confirm that the lock is in its default position before you begin removing any components.
Remove the Exterior Hardware
Start by loosening the visible screws that hold the knob or handle. Once the screws are removed, pull the hardware away from the door. This exposes the inner assembly and gives you access to the plates that cover the cylinder housing.
Expose the Cylinder
Carefully lift the rose plates or decorative covers with a flathead screwdriver. Some plates have a snap fit while others conceal small screws. Once the plates are removed, you can see the cylinder body and the retention elements that keep it in place.
Release the Retainer
Most cylinders are secured by a fixing screw on the door edge. Others use a spring clip behind the hardware. Loosen the fixing screw with the appropriate screwdriver or remove the clip with pliers. When the retainer is released, the cylinder becomes free to slide out of the housing.
Remove the Cylinder
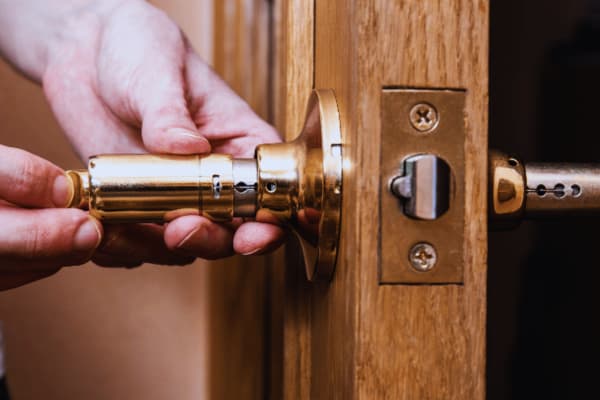
Insert the key into the cylinder and turn it slightly. This rotates the cam into alignment with the lock body. Gently pull the cylinder outward while holding the key in position. If you feel resistance, apply a small amount of graphite lubricant and try again. Avoid using force that can damage the internal structure.
Installing the New Cylinder
Measure for an Accurate Fit
A correct fit protects both security and hardware performance. Measure the full length of the old cylinder and the distance from the center of the fixing point to each end. Euro profile cylinders require balanced measurements so the cylinder remains flush with the door surface. Proper sizing ensures smooth operation and prevents the cam from binding.
Position the New Cylinder
Insert the key into the new cylinder and rotate it slightly to align the cam. Slide the cylinder into the lock body until it seats firmly. Reinstall the fixing screw or the retainer clip and tighten it carefully. The cylinder should feel secure without pressure that restricts movement.
Test Operation Before Closing the Door
Keep the door open while you test the new installation. Turn the key several times from both sides to confirm that the lock engages and releases without friction. Check the handle or lever to ensure the latch retracts smoothly. Small businesses with shared entry points should test access from both directions to maintain consistent employee movement.
Troubleshooting Common Issues
Cylinder Does Not Slide Out
If the cylinder feels stuck, friction is usually the cause. Apply a small amount of graphite lubricant, turn the key gently, and pull the cylinder outward. A soft tap on the surrounding hardware can help release tension without harming the mechanism.
Key Is Hard to Turn After Installation
A tight key movement often indicates minor cam misalignment. Loosen the fixing screw slightly, adjust the cylinder angle, and retighten. A small adjustment typically restores smooth rotation.
Fixing Screw Is Not Visible
Some locks hide the fixing screw under the faceplate or latch plate. Remove these components to access the screw. This design is common on reinforced residential doors and many commercial grade installations.
When Professional Support Is Helpful
Call a locksmith when the cylinder remains stuck after multiple attempts, when the lock uses a high security configuration, or when you want to ensure consistent performance across multiple business doors. Professional support helps protect hardware and maintains a reliable access control routine.
FAQ
Can the door close after the cylinder is removed?
Yes, the door can close, but it cannot lock. Use a wedge to keep the door stable during work to avoid unplanned closure.
What if I do not have a cylinder removal tool?
Most screw retained cylinders can be removed with standard screwdrivers. Clip based systems can often be released with a paperclip or a small Allen wrench.
Can a new cylinder use the same key?
This is possible only with a rekeyable cylinder or with locksmith support. Standard replacement cylinders come with their own keys.
How do I know whether to replace the cylinder?
If the key remains difficult to turn or the lock does not respond even after lubrication, the cylinder is likely worn and replacement is recommended.
How do I remove a door lock cylinder?
Remove the handle, expose the retainer, release the fixing screw or clip, and pull the cylinder out while turning the key slightly to align the cam.
About EOS SECURE
EOS SECURE delivers precision engineered mechanical and electronic lock cylinders designed for long term stability in both residential and commercial environments. Since 2011, our factory has operated under ISO9001 and ISO14001 certification and meets international standards including EN1303 and SKG. With advanced Swiss type CNC machining and strict quality control, we provide lock cylinders trusted by property managers, OEM partners, and businesses worldwide. Whether you need small batch customization or high volume production, EOS SECURE offers consistent performance and dependable support for secure entry management.